


Background introduction
March 11th received a standard spherical lens provided by Changchun, a diameter of 100mm, the radius of curvature of 428.95mm. After the sample was received in Dalian, the detection of the radius of curvature of the sample and the accuracy of the sample were detected by the fringe detection equipment.
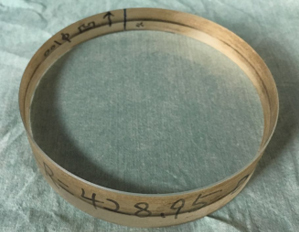
Standard sample
Actual test results of lenses
The lens in the actual detection, we according to the distance from the screen and camera distance is 1.65 meters place, still using the 75mm lens, because the lens focal length is longer, the analysis of the middle square area of the 70mm*70mm lens, and calculate the optimal curvature.
The picture is as follows:
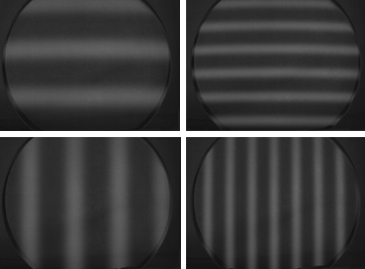
Horizontal and vertical fringe data
Slope Error RMS the best assessment method is used in analysis of optimal curvature, the initial step is larger, gradually analysis, more detailed results are as follows: (the vertical coordinate is Slope RMS (RAD), the abscissa is the radius of curvature (mm))
1.Radius of curvature from 420mm-430mm, step 1mm
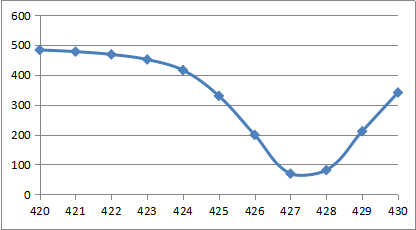
Optimum curve
2.Radius of curvature from 426.5mm-428mm, step 0.1mm
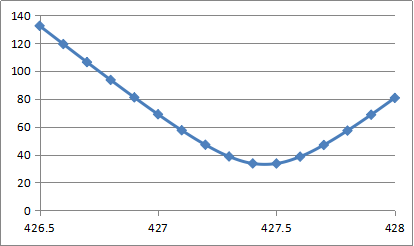
Optimum curve
3.Radius of curvature from 427.30mm-427.60mm, step 0.01mm
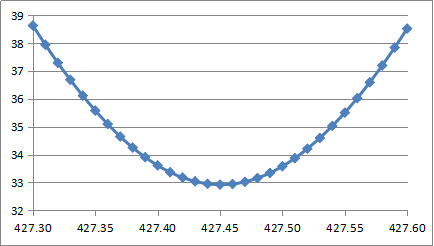
Optimum curve
4.Radius of curvature from 424.440mm-427.460mm, step 0.001mm
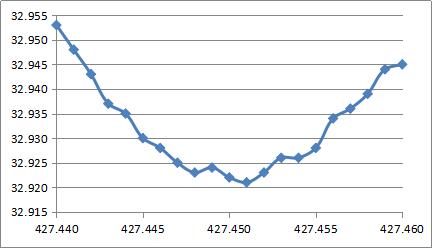
Optimum curve
Through the above optimization curve, we can see that the accuracy of the device is in the order of microns, and the final curvature radius is 427.451mm, and the corresponding surface error is 32.920 rad.
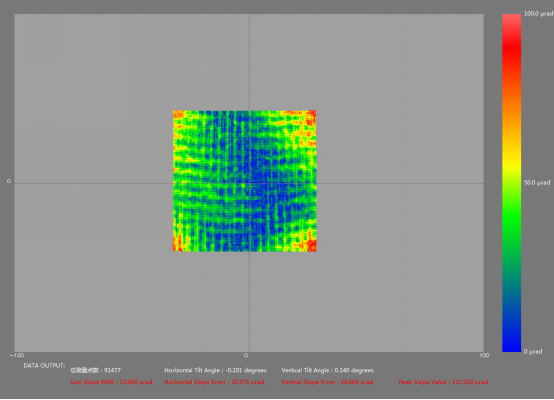
Error distribution of optimal curvature
According to the distribution map, the main error is the error caused by the fringe method and the distortion of the lens. If the two kinds of errors are improved, the accuracy of the measurement can be higher
Analysis and improvement of test results
Through the actual test, the accuracy of the system can reach micron level.
In the aspect of accuracy, because the actual site conditions can only guarantee the relative position error of the measurement in the mm level, the effect of the MM grade error is confirmed in the algorithm:
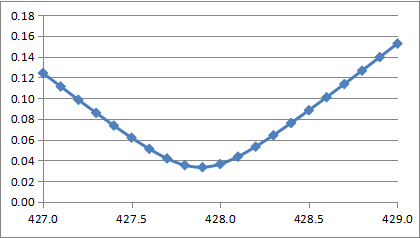
The optimal curvature curve when the distance error is 1mm
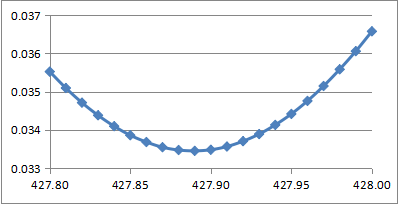
The optimal curvature curve when the distance error is 1mm
The best 427.45 to 427.89 variable curvature changes, reached 0.44mm, measuring the large curvature of the lens is visible when the position error of great influence, need to focus on ensuring the relative position and size of all measuring equipment.
In summary, equipment in the detection of large curvature lenses, high accuracy up to micron level, but the accuracy is affected by the position error is larger, in order to ensure the accuracy of measurement, the need to focus on to ensure the relative position of good survey equipment. In the case of equipment calibration, if the relative position before and after the placement is guaranteed within 0.1mm, the measurement accuracy can reach 0.05mm.